1) Getting started with Ning 3.0 network
Firstly, we will create a blank website on the Ning 3.0 platform for you. This way you will not spend a single day of your 14-day trial period on waiting till all the data is transferred to the new platform.
2) Launching content migration from your Ning 2.0!
We will copy all the content and transfer it to Ning 3.0 network. It includes all the photos, videos, posts, forums, groups, events, articles, pages, messages, comments, and other data. The duration of this step mostly depends on the quantity of the data you have on your 2.0 website.
3) First steps towards new layout and design
We can discuss your preferences in terms of design and help you create a brand new network style with the assistance of our developer or recreate the design from your Ning 2.0 website.
4) Start of the trial period
Once everything is settled, we activate an agreed billing plan with a 14-days free trial. You can use this time to get acquainted with the new platform, check all the features and the migrated content, and get ready to move your members to the updated network.
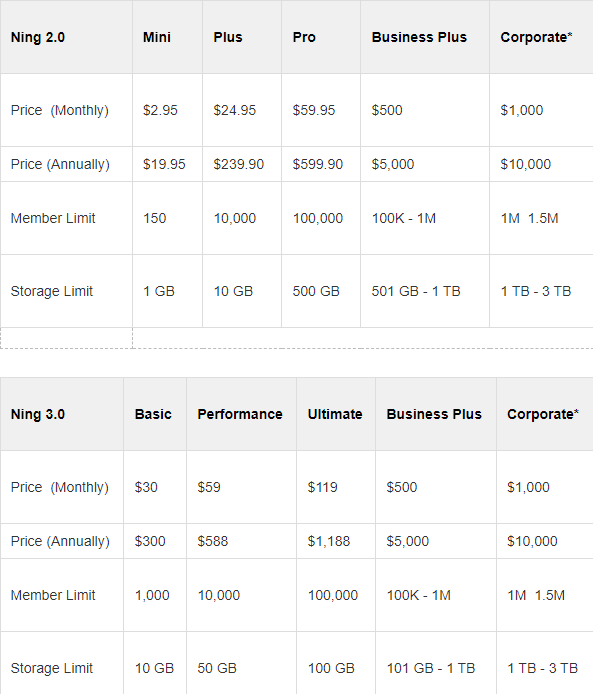
Here are plans for both platforms:
*If none of the Ning 3.0 plans suit your needs, a custom plan may be negotiated.
5) Final stage
At the final stage of the migration process, our team updates the content on Ning 3.0 (we will migrate all the content that was added to your 2.0 network during 3rd and 4th steps), switches URLs between your Ning 2.0 and Ning 3.0 network and helps you with setting up your custom domain. Finally, upon your request, we cancel Ning 2.0 website and credit your account`s balance* for unused time.
*the credit will be added to your ning.com account and can be used towards upcoming payments for the subscription(s)
Other Helpful Links
- Ning 2.0 Equivalents in Ning 3.0
- Wondering what the migration process will entail? Read What to Expect When You’re Migrating
- Want to know what will and won’t migrate from your Ning 2.0 Network to its new Ning 3.0 home? View the lists of Content That Cannot Be Migrated.